Create equations and manage 1RM
Build an exercise-specific load–velocity profile, select the active equation, or enter a manual 1RM for percentage loading.
An equation is Vitruve’s name for a load–velocity profile (L-V profile, also called an RM equation): a relationship between the load and the velocity recorded for a particular athlete and exercise. It supports estimated 1RM and related load calculations, so you can choose loads from measured velocity.
Load and velocity have a near-linear inverse relationship: heavier loads move slower. Measuring velocity at a few submaximal loads lets the app predict the load at which velocity would fall to the 1RM velocity for that movement.
The estimate is not a direct measurement of a maximum lift. Its usefulness depends on the selected exercise, metric, recorded loads, and profile quality.
Before creating an equation
- Choose the correct organization and athlete.
- Select the exact exercise variation you will use afterward.
- Choose one metric: MV, MPV, or PV. The form starts with MPV selected; peak velocity is a common choice for ballistic lifts such as power cleans.
- For device capture, connect and activate the encoder.
- Use a testing sequence agreed with your coach so the loads and technique are appropriate.
Equations are available across roles and plans. Some suggested-load or advanced display features have separate plan access.
1. Open the creation form
Open Equations, then select +:
- Web: in the left sidebar, open Tests → Equations. The Training screen also links to Equations.
- Mobile: tap More and open Equations.
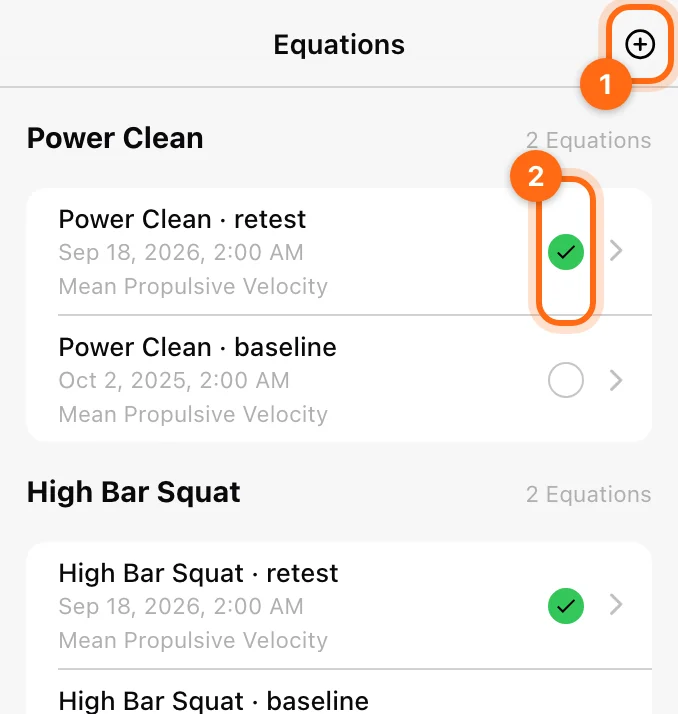
Choose Name, Metric, and Exercise. A dated or descriptive name, such as “January Josh”, helps you recognize the profile later. Until you create one, the list shows “No equations yet”.
In Coach Mode, choose the roster and then the active athlete whose row you are filling. Each athlete needs their own recorded values.
2. Record four progressive loads
The creation form uses four progressive load rows and a final 1RM-velocity reference row.
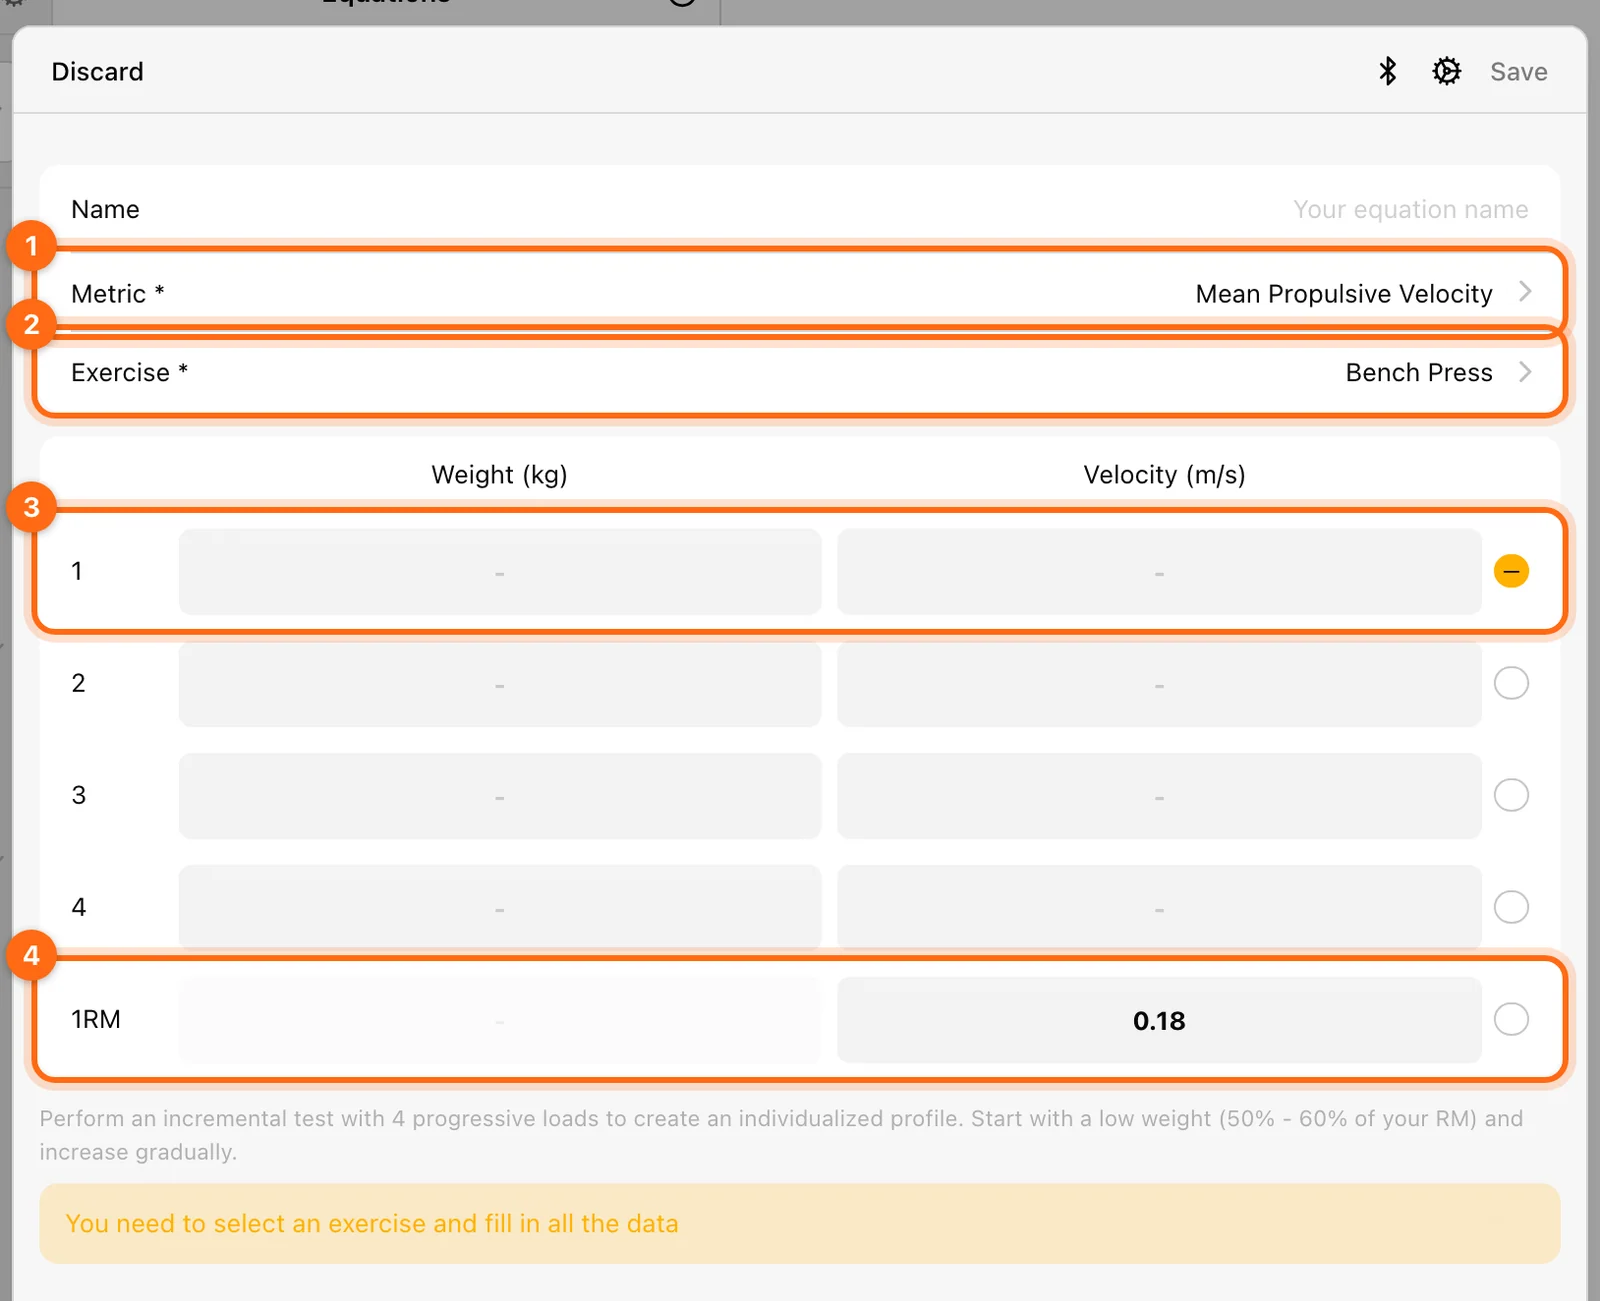
- Select the first test row and enter its load.
- Capture the set with the encoder, or enter the appropriate recorded velocity in the row.
- Check the row before continuing. Encoder capture uses the highest recorded concentric velocity for the chosen metric.
- Repeat with progressively higher loads.
A suggested structure, with each set performed with maximal intent:
| Set | Load (% of estimated 1RM) | Reps |
|---|---|---|
| 1 | about 50% | 3 |
| 2 | about 60% | 3 |
| 3 | about 70% | 3 |
| 4 | about 80–90% | 3 |
Rest at least 2–3 minutes between testing sets; fatigue during profiling degrades accuracy. Keep the encoder in the same position for every set.
The form expects weight to increase and velocity to decrease across the progressive rows. Messages such as “Weight must be greater than the previous one” or “Velocity must be lower than the previous one” identify a row-order or measurement problem.
Do not mix peak velocity from one row with mean velocity from another. Enter loads in the displayed measurement system.
3. Check the 1RM velocity reference
Review the final reference velocity for the selected movement. The 1RM velocity is crucial to the estimate. When you choose the exercise, the app fills a study-based default (in m/s) for supported movements:
| Exercise | Default 1RM velocity |
|---|---|
| Bench Press | 0.18 m/s |
| Deadlift, Romanian Deadlift, Sumo Deadlift | 0.14 m/s |
| Back Squat, Low Bar Back Squat, Front Squat | 0.32 m/s |
| Pull Up | 0.22 m/s |
| Military Press | 0.20 m/s |
| Hip Thrust | 0.24 m/s |
| Bench Pull, Row | 0.53 m/s |
| Any other exercise | 0.25 m/s |
The value still needs to be appropriate to the profile you are creating. If you do not know the athlete’s 1RM velocity, you can measure it from a true 1RM lift, from the last rep of a set taken to failure (the last rep of an RM set moves at nearly the same speed as a 1RM), or use data from a similar exercise as a reference. Ask the responsible coach if you are unsure which reference to use rather than copying a value from a different exercise.
The app uses the profile and reference velocity to calculate the corresponding estimated load. You do not need to turn this software step into a maximal-lift attempt just to fill a field.
4. Review quality and save
Once the required data is filled, inspect the chart, R², and the quality label:
| Label | R² | What to do |
|---|---|---|
| Perfect equation | 1.00 | Good to go. |
| Almost perfect equation | above 0.97 | Good to go. |
| Improvable equation | about 0.94–0.97 | Usable, but repeating the test is recommended for better accuracy. |
| Bad equation, repeat | below 0.94 | Discard it and test again. |
Common causes of a poor fit are inconsistent effort, too narrow a load range, and technical or placement errors.
Quality describes how the entered points fit the profile. Even a high fit does not correct a wrong athlete, exercise, metric, or load unit. If the form reports poor quality, review those inputs and repeat the inconsistent test data before using the estimate.
Select Save, then find the equation under its exercise in the list. While it uploads it can appear under Pending equations. Use the equation’s green selection checkbox to make the intended profile active. Creating multiple profiles is not the same as choosing which one training should use.
You can keep several profiles per exercise, for example for different training blocks or fatigue states, and switch the selected one whenever it better suits the session. The list groups equations by exercise and shows the count, the creation date, and the metric of each.
Read an equation’s detail
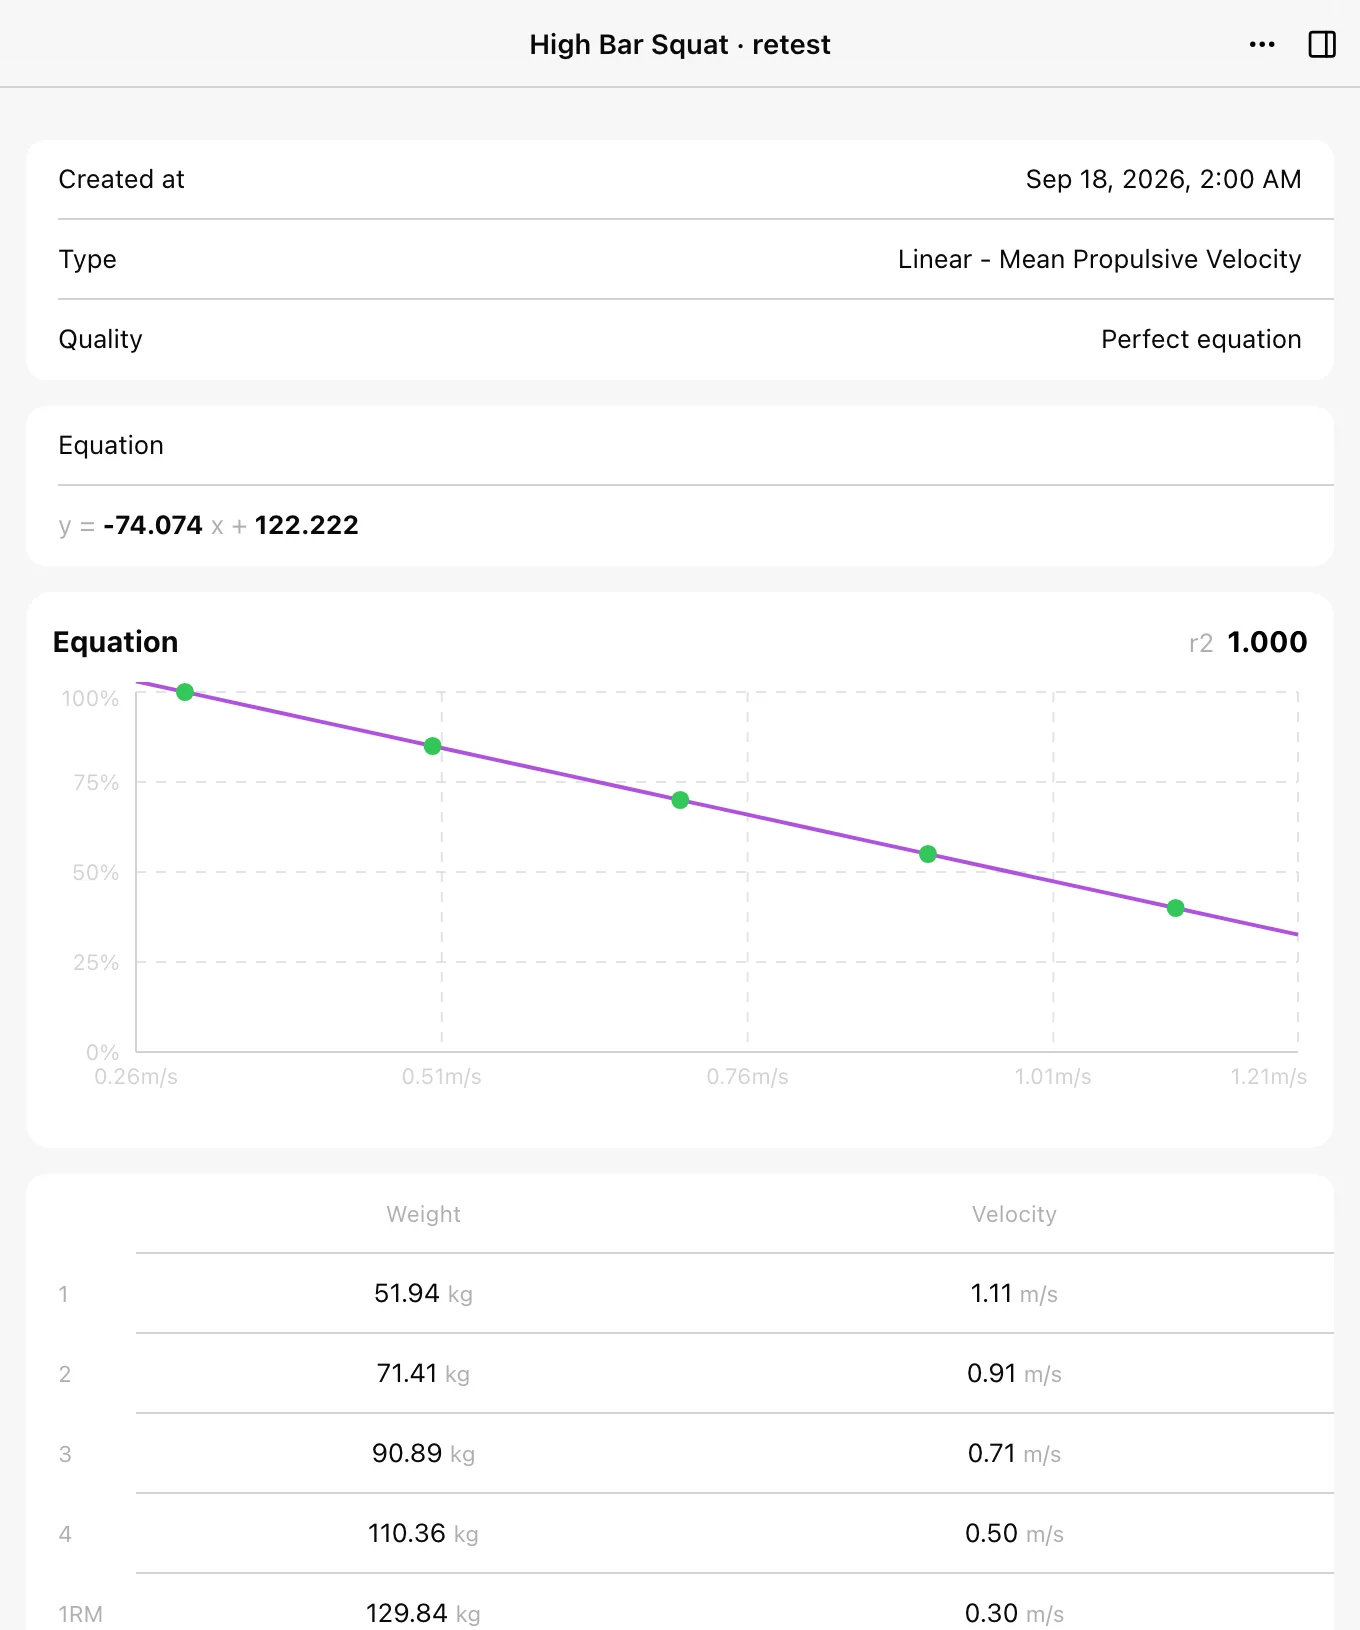
Open an equation to see Created at, Type (Linear, Polynomial, or Own), Quality, the Equation formula with its r2, and the table of Weight and Velocity rows 1–4 plus the 1RM row. The detail’s ⋯ menu offers delete.
Build a profile from recorded training
Coaches can also build an equation from sets the athlete has already lifted, without a dedicated test. In Labs → Insights → VBT, the Load–velocity profile tab fits a profile from the selected period and saves it here with Save profile, as the athlete’s selected equation. See VBT Insights.
Create or select an equation from exercise settings
You can also manage equations from an exercise: open the exercise, select Settings, and choose the scope:
- Organization: applies to all users in this organization.
- Athletes: applies only to the selected athletes and overrides the organization setting.
- Personal: applies only to you in this organization and overrides the organization setting.
In the Equations section (“Create quick equations for estimating your 1RM”), select an existing equation’s circle to make it the selected one, or Create new equation to enter a profile for that exercise. See Exercise settings for the ROM and 1RM filters on the same screen.
Default equations
Older help articles describe 10 built-in default equations (High Bar Squat, Front Squat, Low Bar Back Squat, Bench Press, Military Press, Hip Thrust, Pull-Ups, Row, Deadlift, and Sumo Deadlift) reached through Exercises → Settings → Organization → Equations. In the current app, those study-based values appear as the default 1RM velocity in the table above when you create an equation, and the same Organization scope in exercise settings is where you choose the equation for an exercise.
Start with these defaults, then create your own profile when:
- You train non-standard variations or loads.
- You want personalized tracking based on the athlete’s own performance.
- You coach athletes with unique movement patterns.
Individual profiles are more accurate than generic group values, because two athletes with the same 1RM can move the same load at different velocities.
Enter manual 1RM instead
Open Settings → Training:
- Find 1RM MANUALLY SET.
- Open Enter 1RM Manual by Exercise.
- Select the athlete and exercise where applicable.
- Enter the intended value in the displayed kg/lb unit and save through the available control.
- Enable Override 1RM when you want the manual value to take precedence for exercises where one was entered.
The override does not invent a manual 1RM for every exercise. Body weight in an athlete profile is a different measurement.
Use the equation during training
With an active profile, the estimated 1RM appears on the VBT training screen, and percentage-based loads can be calculated from it. The 1RM filter can discard estimations that exceed a selected velocity. See Run a VBT session.
If no estimate appears during training
Check the active athlete and exercise, the selected equation, its metric, the actual load, the manual override, the exercise’s 1RM filter, and access to the display feature. Follow Unexpected velocity or 1RM in that order.
Maintain the profile
Create a new dated profile when the testing conditions or athlete’s performance meaningfully change, for example every 4–8 weeks as athletes adapt, then select the intended active one. Avoid estimating 1RM from loads very different from those used to build the profile. Equations do not have the same rename/clone workflow as program templates; use their available create/select/delete controls.